| Home | Job | Pinball | Photo Album | Automotive | Press/Awards | Contact |

Earth Shaker Pinball Machine
Introduction
I occasionally check Craig's List for pins, and in May 2011, saw a listing for a sample Earthshaker with a sinking institute. This was an unusual listing, and it was in my price range. So I contact the seller, and proposed a swap for the BOP. After some discussion, Rob added a small amount of cash, and we completed the deal.

Post restoration photo of the playfield and its parts.
As
the name implies, this pinball machine has an earthquake theme.
It is an early sample machine with a building that sinks
below
the playfield during certain modes. To save cost, this
feature
was removed from the production machines, and it makes this one more
collectable. It also features a shaker motor that shakes the
machine to simulate an earthquake during certain modes.
Earthshaker is one of the highest ratest System 11 machines, along with Whirlwind and Banzai Run. I think this era of pinball machines offers the most bang for the buck, and are a lot of fun to restore and play compared to more recent machines.
Earthshaker is one of the highest ratest System 11 machines, along with Whirlwind and Banzai Run. I think this era of pinball machines offers the most bang for the buck, and are a lot of fun to restore and play compared to more recent machines.
Painting and Restoration
I had this machine for 10 months before I decided to restore it. I first started with the electronics in the backbox, and eventually found some poorly done repairs to the General Illumination (GI) circuit on the auxiliary interconnect board. This led to the discovery of a dead short in the GI circuit somewhere on the playfield. I realized that it was time to do a complete restore on the playfield. Fortunately, the main areas of the playfield were protected by clear mylar sheets, so the paint was in really great shape.
For the restoration step, I performed the usual steps of removing all the playfield parts, putting the playfield on my rotisserie, and removing the mylar with freeze spray, in order to do the repairs needed.

My
work setup. In the background you can see my electronics
workbench where I repair circuit boards. The rotisserie,
which holds the playfield, is
fastened to the table.

Opposite view of the workbench with the playfield rotated upside down.
This system allows easy access to all parts of the playfield for repair.
The photos below show some of the worst worn areas.

Opposite view of the workbench with the playfield rotated upside down.
This system allows easy access to all parts of the playfield for repair.
The photos below show some of the worst worn areas.
Heavy wear in the shooter
lane.

Wear near pop bumpers where the mylar did not cover.

Top loop ball wear.

Major wear as usual in the outlane where the ball drops
from the left ramp.

These are the main paint colors I used for the repainting.
Wear near pop bumpers where the mylar did not cover.
Top loop ball wear.
Major wear as usual in the outlane where the ball drops
from the left ramp.
These are the main paint colors I used for the repainting.
I used the above paints to repair the damaged parts. The blue and red were lightened very slightly, while the others could be used without modification. As before, the paints were thinned to ensure that the results were flat and not bumpy.

This area is mostly hidden once all the ramps are reinstalled, but the entire
area was repaired.

Repair of the area under the pop bumpers.

The yellow in the outlane area matched quite well.

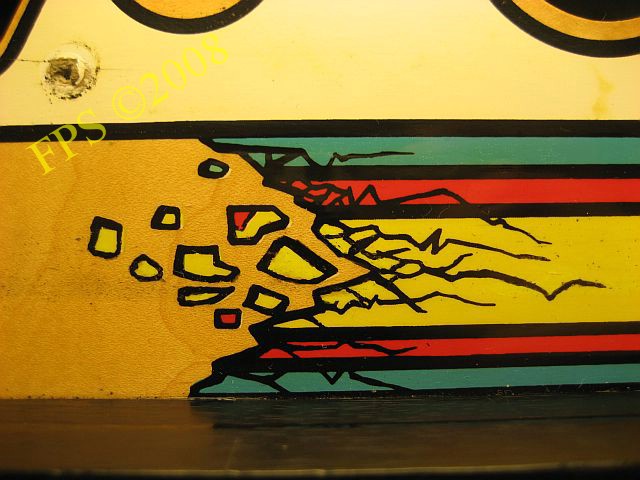
This was the most challenging area to repair. I first painted the yellow parts, and then
applied a thin layer of brush clear. This allowed me to easily remove the black lines
that I would add afterwards if I made a mistake. I am quite happy and
surprised about how it turned out. Compare to this image from Fred's site.
Overall view of the bottom part of the playfield after repainting and clearcoating.
I made a 'brown board' playfield by projecting a page of the manual onto a cardbard panel. I then traced the major features with a Sharpie, and the resulting board was a good way to store all the playfield fasteners and keep track of their intended locations.

All the fasteners of the playfield mounted in their
approximate locations on a cardboard panel.
Main switch hole
One new aspect of the restoration on this machine was the main switch hole underneath the cabinet. The edge around this switch, normally a clean sharp hole, was broken and crumbly. Every time I switched the machine on or off, I could feel small particles coming loose from this ragged edge. This was clearly not a good long term situation.

Close-up of the main switch area. Note the eroded edge of the hole.
To
repair this broken edge, I would ideally flip the cabinet upside down,
make a forming dam, and fill the missing area with liquid epoxy,
allowing it to settle level with the bottom face. This is
similar
to other cabinet
repairs I have done. However, I decided to try a
different approach due to the hassle of inverting the cabinet.
I debated using epoxy with a putty texture that I could kneed and push into the divot, but I decided to use liquid epoxy as I figured it would best mesh with the fibers and lock itself into the wood.
The repair was done by using a small patch of release liner from a roll of 3M transfer adhesive. Working underneath the cabinet, I would first apply a small amount of epoxy to the edge of the hole, watching to make sure none was dripping down. I would then cover the hole with the release liner, and press a flat surface up onto the release liner. This was essentially a stack of boxes, and this gave a good amount of force without muscle strain. After the thin layer had dried, I would repeat the process for another layer. Once the liner was pressed up to the hole, I could apply some more epoxy from the top through the cabinet. This method worked just as I had hoped, and produced a nice inverted 'puddle' of epoxy that was flat with the bottom of the cabinet.

Completed repair showing the release liner under the cabinet. Note
the very nice flat 'puddle' of epoxy filling in the missing edge of the hole.
The epoxy has 'wet' the wood, and is locked into its surface.

Once all the epoxy had cured, I used a round file to restore the straight
walls of the switch hole. Corrosion on switch plate was also removed.

Parting shot: Another view of the restored upper part of the playfield.One new aspect of the restoration on this machine was the main switch hole underneath the cabinet. The edge around this switch, normally a clean sharp hole, was broken and crumbly. Every time I switched the machine on or off, I could feel small particles coming loose from this ragged edge. This was clearly not a good long term situation.
Close-up of the main switch area. Note the eroded edge of the hole.
I debated using epoxy with a putty texture that I could kneed and push into the divot, but I decided to use liquid epoxy as I figured it would best mesh with the fibers and lock itself into the wood.
The repair was done by using a small patch of release liner from a roll of 3M transfer adhesive. Working underneath the cabinet, I would first apply a small amount of epoxy to the edge of the hole, watching to make sure none was dripping down. I would then cover the hole with the release liner, and press a flat surface up onto the release liner. This was essentially a stack of boxes, and this gave a good amount of force without muscle strain. After the thin layer had dried, I would repeat the process for another layer. Once the liner was pressed up to the hole, I could apply some more epoxy from the top through the cabinet. This method worked just as I had hoped, and produced a nice inverted 'puddle' of epoxy that was flat with the bottom of the cabinet.
Completed repair showing the release liner under the cabinet. Note
the very nice flat 'puddle' of epoxy filling in the missing edge of the hole.
The epoxy has 'wet' the wood, and is locked into its surface.
Once all the epoxy had cured, I used a round file to restore the straight
walls of the switch hole. Corrosion on switch plate was also removed.
Links
- Restoration of another
ES (Fred's site).
Log
- 5/30/11 - Machine obtained from Rob Jones by trading for the BOP he was superb seller and delivered the machine. I look forward to future trades.
- 3/9/12 - Restoration finally starts by stripping the playfield. Useful for reassembly: tear down log.
- 3/24/12 - Playfield ready for clearcoat. I used 9 oz of freeze spray and 20 oz of Isopropyl for the removal of the mylar and the cleanup.
- 3/27/12 - Clearcoating with Varathane complete.
- 4/1/12 - Reassembly of playfield complete.
- 4/10/12 - Repair of main switch hole.
- 9/16/12 - Machine sold to Russell, from whom I
purchased the F-14.