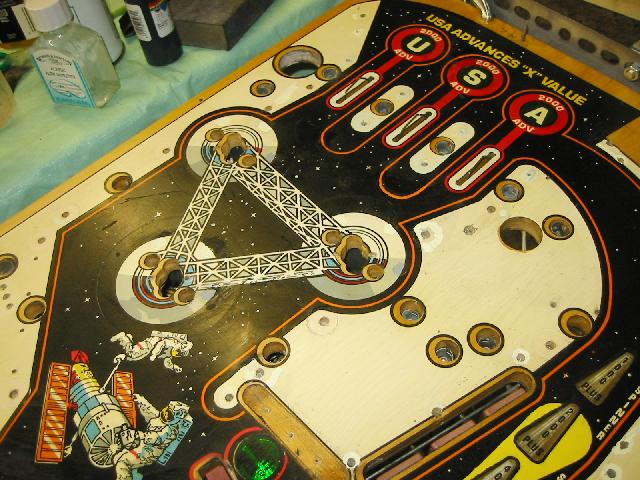
In the picture above,
the 2x3 is
clamped to a table top, which cantilevers the playfield out in the
open. A "floor flange" is screwed to the wood with three wood
screws. From there, a nipple is threaded into the flange and
connects to the pipe union. Another nipple, and another
flange
leads you to the angle iron where the playfield is mounted.
The
same mechanism is built for the other side. All hardware is
1/2"
pipe, and was purchased from my local Lowe's, and costs almost $40
total. I did not need to cut or drill any metal for the
construction. Make sure all joints are very tight so that the
playfield will be stiff when the union is tight.
During construction, make sure the rotation axis of the two unions are
as aligned as possible by careful measurement of the distance from the
table and other offsets. After building up the two sides, I
gently
lowered the playfield onto
the angle irons. They were then fastened down from below and
with
small C-clamps. Once
completed, the unit rotated very well, and felt balanced. I
initially thought of putting a small amount of grease
in the unions, but decided against it after assembly. Make
sure
you put the same side of the two unions facing the same way.
This
way you turn in the same direction on both unions for loosening and
tightening.

The rotisserie allows easy access to the patient. As for the
playfield, it is in extremely bad shape.
Very dirty, but hopefully it can be refurbished with time and
care. The plastics are
complete, and arrived packaged separately (ramps sort of visible in the
top left).
One aspect I like about the above design that I have not seen anywhere
else is that the playfield is cantilevered out into free
space.
This allows me to work at the field like sitting at a table, with my
chair under it. I can of course tip it like a draftmans table
for
the optimum angle. I can also crawl under it to pass wires,
or to
have a buddy thread a part through from the top to the bottom.
Note that it is also possible to use this idea with the wooden beams in
a vertical position. They could be bolted to the sides of a
table
or a floor stand. This was my original idea, but the design
evolved a bit. Another variation is to use beefier
gauge
pipe (such as 3/4" or even 1") in case the friction of the 1/2" union
is
insufficient. In my case, if I use a set of
channel-locks to tighten them, the friction is very high due to the
large surface area inside the union (to form a water tight seal).
Your
website looked familiar, but then I
found out why... I used the
same technique
you used to make a playfield rotisserie! Thanks for the
idea!
I
modified your
design a bit to make it look like the original metal
playfield
rotisserie which could easily be taken apart and stored. The
only difference
is that I made it out of wood.
My problem was that my desk was
not long
enough to attach the wooden
bars to it. So, I bought a large rectangular piece of wood, mounted 2
wooden bars under it over its entire length (for strength), and that
whole piece is put on my desk. It's heavy and rigid.
On top
of that, I build 2 upside down T
structures out of wood on which
I attached the
plumbing parts, like you did. Those T structures are
fixed to the big
rectangular piece of wood using wing bolts. The
playfield then
goes between these 2 T structures. Looks wonderful! :-)
The Original Condition
Some pictures of the
playfield before
I started work on it. At this point, I had only
removed the plastics to afford a better view of the playfield.

Top of the playfield. Lots of dirt everywhere. The
ramps
were shipped separately, so they are not seen here.

Bottom of the playfield. The mylar has protected the paint
over
the years, but has nicks in it. As a result,
my initial plan of simply buffing the mylar won't work.

Top left corner with the pop bumpers and the Hubble graphic.
Throughout the renovation, I
will show this angle the most.

The Shuttle toy. Phew. Lots of work
needed. Note the
large crack near the entry hatch,
more dirt, and the usual broken wing flaps.

The bottom right corner (where the ball eject mechanism is) had a split
in the narrowest part of the
playfield. When I found this, my heart fell, as I did not
know if
I could repair this problem.
The split is visible as the dark line, and extends downwards.
Sorry, for the blurry image.
Stripping the Playfield
The first job will be to strip the top of the playfield of all
parts. After
a few days of intermittent work, all the hardware on the top of the
playfield was removed.

The view of the top left with all the parts removed. Note the
really dirty pop bumper mylars.
Some of them have curled up, and allowed dirt to enter
underneath. Note also the mini C-clamp
at the top of the image that was added after the
discussion
on
RGP.

I repaired the crack in the playfield with epoxy, and the result turned
out great. I was relieved to
find that the playfield was not warped after I was done, and after some
light sanding, the
repair is not visible from the top side. Note the bead of
epoxy
on the inner corner.
With the parts removed, I
started to
clean the exposed areas of the playfield with alcohol and a Magic
Eraser.
I then moved onto mylar removal.
Mylar Removal
There are three prevailing methods to removing mylar: the first is to
use
freeze spray to solidify the glue, the second is to dissolve the
glue with a solvent such as Goo-Gone or Naphtha, finally, the third is
to use a hair dryer to soften the glue (see
links
below). I decided to
start at the pop bumpers because that part of the playfield is
partially hidden. This would allow me some
mistakes. Also
they were extremely dirty. I started
with the freeze spray, and found that the glue was still fresh enough
that the mylar would not budge (I did not pull very hard). I
then
switched to Goo-Gone, and
it readily dissolved the glue (with some patience), and I did not even
need to use a razor. I finished the
removal of the three mylars and residual glue with the solvent.

Tight shot of the pop bumper mylar during its removal. Note
the
nice clean paint underneath.

The discarded pieces of mylar. There were only a few pin
points
of
what could be paint.
The rest was clearly dirt. I was very pleased with the result.

The top left area with the pop bumper mylar removed and lots of
cleaning with alcohol and Magic Eraser.
Note the nice clean area under the ramps (open yellow parts on the
right). The main playfield mylar is
still in place. Note also the dark line across the Hubble
graphic
(visible before) cleaned up completely.
After the popup rings
were removed
with Goo Gone, I proceeded with the top of the playfield (the USA
lanes) with the same solvent. However, I noticed that the
playfield mylar felt different than the popup mylar. The
popup
mylar was thick and sticky, while the playfield mylar was hard, thin
and felt very "old". Nevertheless I continued, but
unfortunately
lifted paint near the popups. Afterwards, when I was cleaning
the
glue residue, I noticed that it did not readily melt with the Goo
Gone. I suspect that I was effectively pulling on the mylar
without the Goo Gone having softened the glue (!).

Mylar removed with Goo Gone from the upper playfield. Note
the
paint loss near the pop
bumper area 8-(. The text at the top sees a LOT of wear and
is
damaged on all my playfields.
I noted that there is white paint as the lowest layer of paint, which
is easily disolved in alchol.
The next layer up is a wide orange line, and the top layer is the
black. Only a thin line
of orange is visible. I adopted this same layering in my
painting
technique. The last color
applied is black.

The same area after touching up. I painted the text area with
a
needle to get the fine control.
Fortunately, the bottom area in the photo is partially hidden by the
pop bumpers. I used
hobby acrylic paint and was able to match the colors extremely well.
Seeing the awful results
I obtained
with the Goo Gone on the playfield mylar, I decided to give the freeze
spray method another try. It seemed to me that if I got the
glue
cold enough, it would act as a concrete barrier to actually protect the
paint underneath. I could then use a solvent to soften the
glue
and remove it chemically. I figured that it would result in
the
least stress on the paint.
After some trial and error, I hit on a method that was very successful
using a razor and the spray:
- Spray local area with Freeze Spray, including under the
mylar
edge that is already up, and the razor itself. The idea is to
get
and keep the glue very cold especially the part that the razor is
touching.
- Press very gently with a rocking motion (left and right
motion)
against the edge of the mylar.
- As soon as the glue is cold enough, it will get very
brittle, and
you can actually "cleave" the glue with a satisfying crackling
sound. Note that very little force is needed, as soon as the
glue
is weak enough it will just crack!
- Make sure the area is kept cold with drops of Freeze Spray.
- Once the mylar is gone, cleanup the glue with alcohol and
Magic
Eraser.
Make sure the razor is
kept clean and
does not pick up glue during this process. A clean razor will
concentrate the force of your finger onto the front sharp
edge.
During cleanup, the Magic Eraser (ME) really shines (hah), paper towels
tend to absorb the alcohol, and the playfield dries up. ME
keeps
the liquid onto the playfield, softening and absorbing the glue into
its matrix. It also appears to be very gentle on the exposed
paint.
The biggest danger is removing up
wide strips of mylar (like the middle part of the playfield).
It
is very easy
to pull on parts of the mylar sheet that is away from the cold spray,
which will bring up paint.

Using Freeze Spray and a razor to remove the mylar. The sharp
edge of the razor is used
to 'cleave' the glue once it is cold. In this state, the glue
will be so hard that you will be unable
to scratch it with the razor held at tangential angles. This
will
protect the paint from the razor.
During this process I
also watched
TOP#3,
which shows the three
methods described. The DVD is highly recommended.
In this
video, Shaggy simply picks the mylar up once it has been sprayed, but
in
my case, the plastic material was so old and brittle that it would
break into little pieces as I pulled on it. So I developed
the
alternate method instead. In TOP#3, Shaggy actually injects
the
Goo Gone with a syringe under the mylar. I did not do this
(just
sprayed it on the edges), so it makes sense that my efforts were so
unsuccessful.
As for the glue cleanup, I tried alcohol, Naphtha and Goo Gone by
squirting a few drops onto the glue and then covering the area with
clear plastic wrap to limit evaporation. After 10 minutes of
waiting time, only the alcohol had softened the glue
significantly. This does not match the experience of
others. Perhaps the mylar glue that used was very old, or an
unusual type.
Mylar removal and touchup painting done. Phew! I
have
learned a lot about mixing and applying paint.
One tool is the bottle of Acrylic Flow Improver at the top of the
image. It touts the ability to reduce the
"blobbing" of acrylic paint without diluting the color like water will.
Repeated from earlier in this document, this is the before picture.

One trick I developed during the repainting was to draw very thin
straight lines using a straight edge with
an overhang and a needle. I realized that my boy's Lego set
offered up raw material for tools.
Note that I decided to also paint the tops of the pop bumper bolts
although they are hidden by the pop bumper skirt..
At this point, I decided to take a break from mylar removal to address
some other components of the playfield.
Playfield plastics
One large cosmetic factor is the playfield plastics. There
has
been a lot written about restoring them (see
links
below). The set on Playfield B was warped due to
heat from
the lamps. I first straightened them by putting them in my
toaster oven set to 250F. They were set in a tray made from a
folded piece of non-stick parchment baking paper. After a
minute
or so, they were soft, and I then flattened them in a book. I
was
surprised, it really does work!

After they were flattened, I removed the big gouges with 800 grit sand
paper, and then
used my random orbit buffer with some rubbing compound to smooth them
out.
I then finished up with Novus 2. They turned out as shiny as
a
mirror.
When using the rubbing compound makes sure to keep the pad damp.
After they were clean and
polished, I
finished with the paint touchup. In the example below, I
first
use opaque masking tape to mask off the black line (next to the blue
field). This allowed me to easily paint the black
line. The
opaque masking tape allowed me to check alignment by holding the
plastic up to the light as the black line is not visible in the
back. After that was dry, I filled in the red and blue behind
the
black line. The alignment is very close, but matching the
colors
were more challenging. I had to reduce the amount of blue
applied
to a thin film or else it would be too dark in translucence.
This
caused the blue to look a little light in reflection as can be seen
below. This implies to me that the original blue ink is very
dark
and is applied in a thin layer.


Afterwards, I touched up the paint on the plastics. Before
(left/top), and after (right/bottom). The red is "Cardinal
Red",
and the blue is "True Blue". I had to balance the right look in
reflection (shown here) and translucence (backlit by playfield lights).
I was also able to glue
pieces
together end-to-end by using plastic tape on the non-paint (front) side
to line the pieces up, and then folding the seam open to drip epoxy
into it. Once it is folded flat, I added some more on the
back. After touching up with paint on the back, it looks reasonable
good. We will see if this passes the test of time.
For more information on making playfield plastics, see my
BOP page.


